
What is the best Scavland loot?
Dense junk (spark plugs, lighters, toolboxes, electrical parts, wire coils, weapon springs) plus journal items and ammo you can shoot. No fake drop-rate or ruble table.

Scavland loot is the economy half of the Vulture loop: scavenge Zalesye, decide what earns the next raid, and extract before greed writes a death recovery marker. Official copy is blunt — ammunition is scarce, preparation decides whether you return with valuable loot or do not return at all. This page is keep / sell / haul, not a price wiki. Exact ruble tags stay TBA. Verified September 6, 2026.
Community high-value junk (density, not a fake gold table): spark plugs, lighters, toolboxes, electrical components, wire coils, and weapon springs. Wiki notes Shift+Click for rapid looting. Community notes a grid / tetris backpack. Stash is safe; the backpack is not. Spend standing on factions after you sell. Repair fuel goes to repair.
| Fact | Detail |
|---|---|
| Goal | Value density vs weight vs what traders actually want |
| High-value junk (community) | Spark plugs, lighters, toolboxes, electrical components, wire coils, weapon springs |
| Fast loot (wiki) | Shift+Click rapid looting — still sort before you walk |
| Pack shape (community) | Grid / tetris inventory — pistols vs long guns eat different squares |
| Prices | TBA. Reputation moves vendor rates. Do not invent a ruble sheet |
| Keep pile | Ammo you can shoot, oil, filters, springs, contract items |
| Death | Backpack drops; safehouse stash stays. See death recovery |
| Related | Repair · factions · contracts · bunkers |
Matched by build plan, shared topics, and guide progression — not random related links.
Official systems in Early Access include crafting, looting, traders, and contracts. Scavland loot is everything that hits the pack: junk, ammo, guns, attachments, repair mats, filters, contract items, and the occasional named relic at terrible condition. The loop is Prepare → Explore → Scavenge → Survive → Return → Upgrade. Scavenge is not “pick up the map.” Scavenge is a filter: what earns the next Upgrade without failing Survive.
There is no published official drop-rate table, no complete vendor catalog, and no ruble API on this site. Traders buy and sell; standing changes access and (community) rates. We will not fill that vacuum with invented numbers. If a screenshot shows a price, it was true for that vendor, that standing, that patch. Check the live stall.
The backpack is a bet. The safehouse stash is the bank. Dying on death recovery rules drops the bet and keeps the bank. Plan hauls as if the pack can vanish.
Rubles, standing, guns, plates, and parts are progression. Vacuuming every crate does not “level scavenging.” It fills tetris squares until you cannot sprint to extract.
Community guides consistently flag a small-parts pile as the density winners: spark plugs, lighters, toolboxes, electrical components, wire coils, and weapon springs. Those names are the high-value junk list we will repeat. They are not official Steam bullet points, and they are not a price list. Density means small (or stackable) items that traders want more than furniture. Weapon springs pull double duty: they sell, and they feed the repair bench with scrap metal. Dumping every spring to buy an optic you cannot mount is how kits rot.
Treat the list as a search pattern, not a religion. A contract that names a different item beats a lighter. Ammo you can fire on the weapons you brought beats a coil you cannot shoot. Filters beat spark plugs if the mist is the actual threat. The junk list wins when the crate is otherwise trash.
A toolbox that fits a few squares and funds a vendor tier is better than a chair that funds nothing and blocks a mag. If two items “feel expensive,” pick the one that leaves space for springs and oil.
Keep a stash pile of weapon springs before you sell the overflow. Field oil is a patch; the bench is the real repair. No spring count recipes here — those stay TBA.
We will not rank spark plugs above lighters with made-up rubles. If your trader pays more for one, that is your standing and your stall — log it for yourself, do not treat this page as a live economy.
Wiki-style beginner notes call out Shift+Click as the fast-loot bind: click through a crate or corpse without nursing every icon. Use it in bunkers when the room is not safe enough for shopping. Rapid looting is a speed tool, not a brain. Everything that flies into the pack still has to survive tetris, weight, and the walk to extract.
After a Shift+Click scramble, stop in cover and sort. Toss bulk that lost to density. Keep contract items. Keep ammo you can shoot. Keep oil. If the pack is a junk drawer, you did not loot — you postponed a wipe. Community clips of bunker piles are why this page exists; they are not a reason to walk out overweight into the mist.

Surface daylight on a known map route can afford inspect. Shift+Click everything in a quiet shed and you will bring home chairs. Rapid loot is for timers, noise, and mutants — not for the first crate of the day.
Shift+Click does not make spark plugs more common. It only makes you die with a fuller pack if you skip the sort.
Community notes describe a grid / tetris backpack: items occupy rectangles, and a long gun is not the same footprint as a pistol. That is why “one more rifle” can be worse than two spark-plug stacks. Official public copy talks about inventory weight management without publishing a cell spec. Believe the live grid. If a community thread says an SMG eats a different shape than a pistol, treat it as a playtest observation until we capture a still — then inspect your own pack.
Tetris is the hidden half of Scavland loot value. A high-ruble item that cannot rotate into the bag is worth zero on this raid. A medium item that fills a hole and leaves a column for mags is worth the extract. Attachments from attachments are often small; empty guns are often large. Prefer parts that fit the gun you already carry, then junk density, then a second gun only if squares remain.
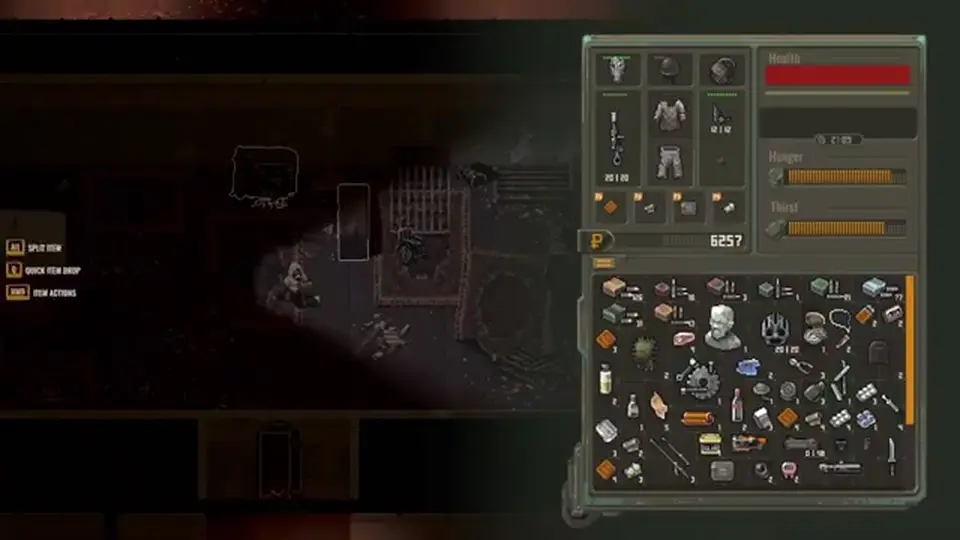
If the UI lets you rotate, use it. If a toolbox blocks the only mag column, the toolbox is not high-value anymore. Extract with the mag.
Keep ammo you can actually fire in the guns on your sling. Keep Gun Cleaning Oil. Keep a gas-mask filter if radiation or mist is on the route. Keep weapon springs and scrap for the bench. Keep anything the contracts journal named. Keep attachments that mount on the gun you own. That is the keep pile. Everything else is a candidate for sell or drop.
Stash the keep pile when you extract. The next raid should not start by re-looting your own hallway. If death already happened, recover with a cheap kit — not with the trophy pile sitting in stash. See death recovery.
Journal retrievals exist so you stop arguing with spark plugs. If the job names a part, that part is the raid. Density junk is the filler around it.
Scarce ammunition is official. A crate of the wrong caliber is tetris poison. Check weapons before you Shift+Click a crate of mystery boxes.
Sell bulky low-tier Scavland loot that does not feed the bench, the mag, or the journal. Sell extra guns you will not repair this week. Sell attachments that stay grey on every receiver you own. Sell overflow junk after the spring pile is healthy. Do it at a trader whose factions standing you are actually building — community notes say different stalls can prefer different goods. We will not invent which butcher pays more for mutant meat.
Vendor prices move with reputation. Exact tables TBA. Rubles unlock standing shops; they do not unlock a skill tree. Buying a scope you cannot mount with money you made by dumping springs is a round trip to poorer.
Spreading junk across every stall “because prices” is how you stay poor in every faction. Pick the vendors that gate the parts you want. See factions.
Oil, springs, scrap, and filters are not vendor bait until stash has a reserve. The next jam does not care that you bought a prettier stock.
When the pack can fund the next Upgrade without failing Survive. That sentence is the whole Scavland loot skill. Overweight extract is still better than a second death if the alternative is greed in a procedural bunkers wing. Night flashlight cones, radiation, and the Mist do not pause because a crate is still blinking. The beginner guide wants one clean extract. So does this page.
If you die, the pack sits on a marker. If you die in a bunker, the pack sits in a layout that will not be the same next time. That is worse than leaving two lighters on a shelf. Extract, sell, repair, take the next contracts line, go deeper.
No oil left, gun under the jam band, filter coughing, night coming, grid full of chairs — extract. Spark plugs will respawn in some container on some future day; your stash will not if you yolo the only filter.
Community demo notes about daily crate refresh are playtest observations. Do not plan a farm route as if this wiki confirmed a 24-hour timer.
Next: spend the haul on factions standing shops, then take contracts.
Dense junk (spark plugs, lighters, toolboxes, electrical parts, wire coils, weapon springs) plus journal items and ammo you can shoot. No fake drop-rate or ruble table.
No. Backpack drops at a recoverable marker; safehouse stash stays. See death recovery.
TBA. Standing changes trays and (community) rates. Check the live trader.
Wiki-noted rapid looting. Still sort the tetris grid before you walk to extract.
Community / playtest notes describe a grid pack. Weight management is official. Cell sizes stay TBA — inspect in-game.
Matched by build plan, shared topics, and guide progression — not random related links.